Create a UPS Shipping Label on the UPS website
Step 1:Visit the UPS website, Log In, and Create a Shipment.
. To start, you’ll need a UPS account.
. If you don’t have one, don’t worry—it’s quick and simple to set up.
. Alternatively, you can ship as a guest.
. Go to the UPS website.
. Log into your UPS account. OR Click on “Shipping” > “Create a Shipment”
Step 2: Enter Package Details and Select a UPS Service
. Input specific information about your package, like its weight and contents.
. After that, it’s time to pick a delivery option.
. UPS offers a variety of services, such as UPS® Ground or UPS Next Day Air®, so choose one that matches your shipping needs.
Step 3: Pay. Download your UPS shipping label.
. Finally, select your payment method.
. Once payment is confirmed, your UPS shipping label is ready to download.
Step 4: Print your UPS shipping labels.
. In the ‘Manage Shipments’ section on UPS.com, find and download your label. Print it using your shipping label printer.
UPS offers free software called UPS WorldShip ® for its customers, designed specifically for efficient and high-speed printing of 4 x 6 labels.
Follow these simple steps to set up your UPS WorldShip with Flashlabel.
(If you have not yet installed UPS WorldShip, please download it from this link
After you have gone through your initial Setup, please open UPS WorldShip and follow the steps below:
Tool > system preference > Printing Setup

Label (4*8)> Printer setup> Change label printer

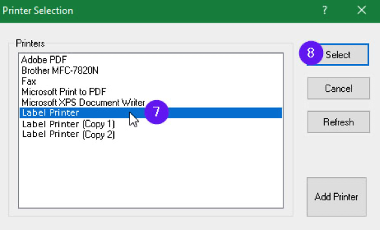
Change Label Printer > Label Printer> Select

Select the printer you have purchased, such as the Y810BT Label. If you cannot find our printer in the list, please install our driver. For macOS, refer to this link; for Windows, refer to this link.

generic Thermal Printer > Thermal 4*6 > apply

Print test page > OK

Was this article helpful?
That’s Great!
Thank you for your feedback
Sorry! We couldn't be helpful
Thank you for your feedback
Feedback sent
We appreciate your effort and will try to fix the article